Modding:Tiles
"Caves of Qud" Texture Files Download for Tile-set Modifications.
This file contains the raw tiles imported into the game, which will help you figure out the right name and folder for each tile you would like to replace. You may only use these files to create modifications for Caves of Qud.
https://www.dropbox.com/s/3hub59uoiamz0vq/caves-of-qud-tiles-200.71.zip?dl=1
The link above is a somewhat outdated tile collection from an older version of the game. To get a more up-to-date version of tile assets, you can either use a Unity Asset Extractor program (there are a few available online), or you can use the Brinedump mod for Caves of Qud (by Armithaig), which will dump assets using an in-game wish.
Modifying Existing Tiles
In order to modify an existing tile, move the .png file in a Textures subdirectory of your mod. Additional subdirectories can be included.
Example:
%appdata%\Caves of Qud\Mods\[your mod name]\Textures\creatures\new_tile.png
Sample ObjectBlueprints.xml updating Mehmet's tile to creatures/new_mehmet.png
<?xml version="1.0" encoding="utf-8"?>
<objects>
    <object Name="Mehmet" Load="Merge">
        <part Name="Render" Tile="creatures/new_mehmet.png"></part>
    </object>
</objects>
Supported File Types
Only .png files are supported.
Tile Format
The default tiles and shaders used in Caves of Qud use 3-color tiles. Black, non-transparent pixels are painted with the foreground color, white non-transparent pixels are painted with the detail color and transparent pixels are painted with the background color.
| Example "3 color" Gunslinger Tile | Example Gunslinger Dynamically Colored In-Game |


These dynamic colors are dependent on the Render part in their ObjectBlueprints.xml:
<part Name="Render" Tile="items/sw_spray.bmp" DisplayName="&ySpray&r-&ya&r-&yBrain" ColorString="&G" TileColor="&G" DetailColor="r" RenderString="012" RenderLayer="5"></part>
Where TileColor represents the the black part of the unfiltered image, and DetailColor will recolor the white part. Transparent pixels will change to the background color of the game, known as viridian.
See Modding: Text Color Codes & Object Rendering for more details on the exact colors and how they are specified.
Palette
To get a palette file for Qud's colors, refer to Visual_Style#Palette.
4th Color
Despite there being only three main colors for the tiles, there are a handful of tiles that use a 4th color, usually RGBA(124, 101, 44, 255). When rendered inside the game, a special formula is performed to create an weighted mix of the tile and detail color, with weight based on the 4th color's R channel (the first number). a 4th color that has 255 red would show up the same as the detail color.
True Color tiles
If you'd like your mod to supply true color tiles instead of the default 3-color tiles (white, black, transparent), then include a modconfig.json in your mod's root with the Following contents.
Truecolor tiles will be shaded as their natural color, with the background color blended in at 1-alpha.
Sample %appdata%\Caves of Qud\Mods[your mod name]\modconfig.json enabling truecolor shader mode
{
  "shadermode":"1"
}
Tile Size
Include a display.txt in your mod's base directory with the following entries to override the game tile height and width
sample display.txt
{
    "tiles":{
        "width":"24",
        "height":"24"
    }
}
Painted Tiles
Walls, fences, and liquids are "painted" tiles. This basically means that the game analyzes whether they are connected to other similar walls, fences, or liquids, and then selects an appropriate tile for them based on how they connect to adjacent squares. For example, you can see that the corners of the following wall look different than the horizontal parts of the wall, and those look different than the vertical segments of the wall.

To create proper walls, fences, and liquids, you must supply files that end in the expected suffixes that will be constructed by the game code when it paints them.
- Walls and liquids use the filename suffix format
-00000000, where each digit may be a zero or a one. The digits indicate whether there is a connecting wall in each of the 8 adjacent cells, starting from the Northern cell and working clockwise. For example, a wall tile within a horizontal segment that has a wall both to the west and the east would use the filename suffix-00100010. To properly create a complete wall or liquid that can be rendered in all possible configurations, you must have 256 individual wall sprites using all combinations of 0 and 1 in the filename suffix. - Fences are similar but only allow connecting with the cardinal directions (N/S/E/W). They use the filename suffix format
_nsew, with the cardinal direction letters always appearing in that order. For example, a fence in a horizontal fence segment with a fence to its west and to its east uses the suffix_ew. A single fence tile with no connections uses the_suffix. To properly create a complete fence that can be rendered in all possible configurations, you must have 16 individual fence sprites using all possible combinations of 0-4 cardinal directions.
Constructing the Filepath
- The root filename for your fence or wall tiles should be specified with the PaintedWall or PaintedFence tag. For example,
<tag Name="PaintedWall" Value="wall_plant" />.- As discussed above, the game will then dynamically append postfixes similar to
-00000000or_nsewto your root filename
- As discussed above, the game will then dynamically append postfixes similar to
- The game will use the
Textures/Tiles/path by default for wall and fence tiles. You can override this by adding<tag Name="PaintedWallAtlas" Value="YourCustomPath" />or<tag Name="PaintedFenceAtlas" Value="YourCustomPath" />. - The game adds a .bmp extension by default. You can change this with the PaintedWallExtension or PaintedFenceExtension tag. For example,
<tag Name="PaintedWallExtension" Value=".png" />.
Refer to the base game's ObjectBlueprints.xml for examples of the above tags in use
PaintWith
You can use the PaintWith tag if you have different types of walls that should be considered the same for the purposes of painting. For example, if you've got a pillar or mural segment that should be painted to appear connected to similar walls around it, you can add this tag to all of the walls involved. The specific value of the tag doesn't matter as long as it's the same for all walls involved. For example, each of the mainframe segments of Ereshkigal share the tag <tag Name="PaintWith" Value="MainframeWalls" />
Painted Wall/Fence Utility
To make it a bit easier to create the full set of required wall or fence tiles, you can use the ImageSlicer utility created by unormal (one of the Caves of Qud developers). The utility will accept tiles in the black/white/transparent color scheme, though it also accepts and correctly processes some other common color schemes using the game palette.
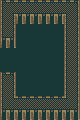
- For walls, this utility expects a 5x5 tile image of walls in the following configuration:
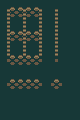
- For fences, this utility expects a 5x5 tile image of fences in the following configuration:

Important note: You must manually create an Output directory in the same location as the executable/project.

Crop your C-shaped wall tile images, put the path to the input file in the top input, type a root output file name in the middle box and hit "wallmaker (C layout)" or "Fencemaker" for fences.
Note that the Watermaker and Wallmaker (legacy) options probably won't work anymore and aren't recommended.