World map: Difference between revisions
mNo edit summary |
(→Interactive Map: Added rect for Eyn Roj) |
||
| (12 intermediate revisions by 6 users not shown) | |||
| Line 1: | Line 1: | ||
{{stub}}__NOTOC__<!-- TOC is intentionally hidden because otherwise it includes mobileonly/nomobile sections even when they aren't visible to the user --> | {{stub}}__NOTOC__<!-- TOC is intentionally hidden because otherwise it includes mobileonly/nomobile sections even when they aren't visible to the user --> | ||
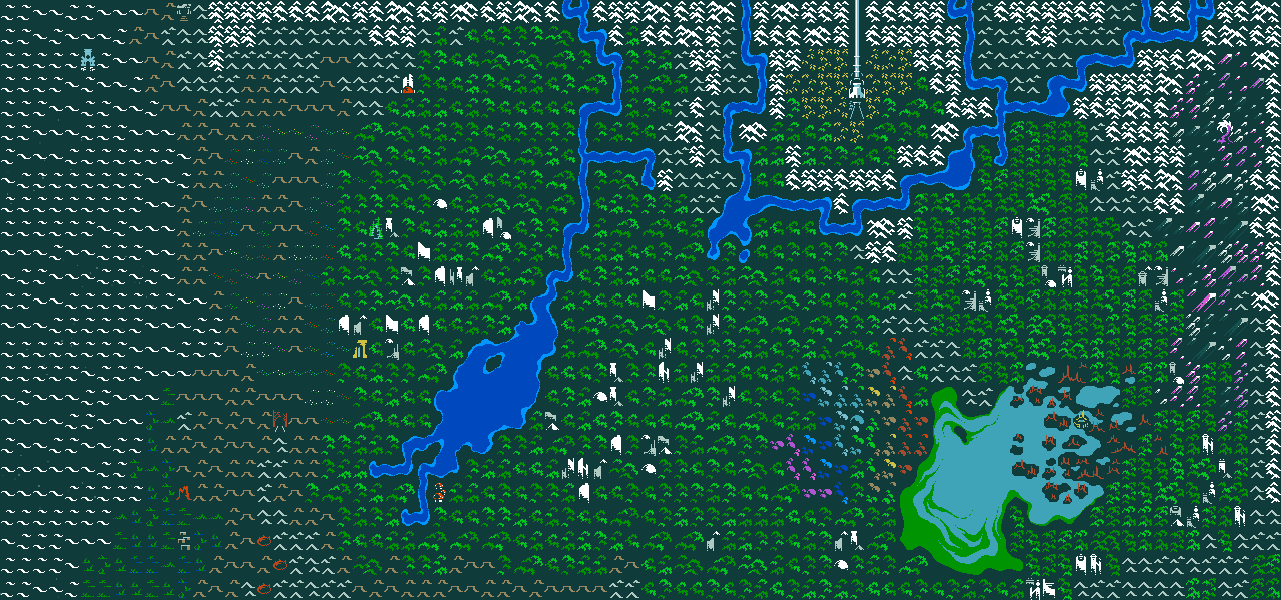
The | The world map is a game construct that facilitates travel to various [[locations]] within Qud. Its overall appearance is largely the same in every game session, however, certain locations may be found in different places and the majority of locations recorded in the [[journal]] are procedurally generated and indicated by a triangle in the corner of the world map tile they can be found in. | ||
<!-- | <!-- | ||
| Line 9: | Line 10: | ||
Click on any location to send you to that page! | Click on any location to send you to that page! | ||
<div style="overflow:auto;height:622px;"> | <div style="overflow:auto;height:622px;"> | ||
<imagemap>File: | <imagemap>File:World_Map_(Moon_Stair).png|alt=The world map of the rusty world of Qud. Each significant location can be clicked to send the user to the relevant page. If the image map does not load or work, please use the regular article. | ||
rect 78 48 96 72 [[Six Day Stilt]] | rect 78 48 96 72 [[Six Day Stilt]] | ||
| Line 62: | Line 63: | ||
poly 1103 0 1103 23 1055 23 1055 47 1024 47 1024 23 992 23 992 0 [[Mountains]] | poly 1103 0 1103 23 1055 23 1055 47 1024 47 1024 23 992 23 992 0 [[Mountains]] | ||
poly 991 24 1023 24 1023 48 1056 48 1056 24 1104 24 1104 0 1135 0 1135 23 1119 23 1119 47 1071 47 1071 71 1039 71 1039 95 1008 95 1008 71 976 71 976 0 991 0 [[Hills]] | poly 991 24 1023 24 1023 48 1056 48 1056 24 1104 24 1104 0 1135 0 1135 23 1119 23 1119 47 1071 47 1071 71 1039 71 1039 95 1008 95 1008 71 976 71 976 0 991 0 [[Hills]] | ||
rect 1088 432 1103 455 [[Lake Hinnom]] | rect 1088 432 1103 455 [[Lake Hinnom]] | ||
rect 1120 360 1135 383 [[Palladium Reef]] | rect 1120 360 1135 383 [[Palladium Reef]] | ||
| Line 70: | Line 69: | ||
poly 1056 384 1056 360 1087 360 1087 383 1071 383 1071 408 1119 408 1119 432 1135 432 1135 455 1119 455 1119 479 1087 479 1087 503 1040 503 1040 479 1008 479 1008 432 1023 432 1023 456 1040 456 1040 407 1008 407 1008 384 [[Palladium Reef]] | poly 1056 384 1056 360 1087 360 1087 383 1071 383 1071 408 1119 408 1119 432 1135 432 1135 455 1119 455 1119 479 1087 479 1087 503 1040 503 1040 479 1008 479 1008 432 1023 432 1023 456 1040 456 1040 407 1008 407 1008 384 [[Palladium Reef]] | ||
poly 959 384 959 408 992 408 992 384 1024 384 1024 360 1055 360 1055 384 1119 384 1119 408 1135 408 1135 431 1103 431 1103 503 1087 503 1087 527 1024 527 1024 503 1007 503 1007 552 1023 552 1023 575 928 575 928 551 896 551 896 480 912 480 912 456 928 456 928 384 [[Lake Hinnom]] | poly 959 384 959 408 992 408 992 384 1024 384 1024 360 1055 360 1055 384 1119 384 1119 408 1135 408 1135 431 1103 431 1103 503 1087 503 1087 527 1024 527 1024 503 1007 503 1007 552 1023 552 1023 575 928 575 928 551 896 551 896 480 912 480 912 456 928 456 928 384 [[Lake Hinnom]] | ||
rect 1152 0 1183 23 [[Mountains]] | rect 1152 0 1183 23 [[Mountains]] | ||
rect 384 216 399 239 [[Ruins]] | rect 384 216 399 239 [[Ruins]] | ||
| Line 86: | Line 84: | ||
rect 704 528 719 551 [[Ruins]] | rect 704 528 719 551 [[Ruins]] | ||
poly 863 528 863 551 847 551 847 575 832 575 832 528 [[Ruins]] | poly 863 528 863 551 847 551 847 575 832 575 832 528 [[Ruins]] | ||
poly 1072 | #Ruins for deep jungle, starting with the two-tile one directly north of the ridge separating deep and regular jungle and going roughly clockwise from there, ending with the two-tile dome one directly south of Lake Hinnom. | ||
poly | rect 991 288 960 311 [[Baroque ruins]] | ||
rect 1088 576 | poly 1039 216 1039 263 1024 263 1024 239 1008 239 1008 216 [[Baroque ruins]] | ||
rect 1071 264 1040 287 [[Baroque ruins]] | |||
rect 1103 168 1072 191 [[Baroque ruins]] | |||
poly 1167 264 1167 311 1152 311 1152 287 1136 287 1136 264 [[Baroque ruins]] | |||
rect 1168 360 1183 383 [[Baroque ruins]] | |||
rect 1200 432 1215 455 [[Baroque ruins]] | |||
rect 1216 456 1231 479 [[Baroque ruins]] | |||
rect 1200 480 1215 503 [[Baroque ruins]] | |||
rect 1232 504 1247 527 [[Baroque ruins]] | |||
rect 1199 504 1168 527 [[Baroque ruins]] | |||
rect 1103 552 1072 575 [[Baroque ruins]] | |||
rect 1055 576 1024 599 [[Baroque ruins]] | |||
#Mountains for ridge between deep and regular jungle. | |||
poly 911 216 911 239 895 239 895 263 864 263 864 216 [[Mountains]] | |||
#Hills for aforementioned ridge. Needs to go under Lake Hinnom and Rainbow Wood. | |||
poly 895 240 895 264 911 264 911 312 927 312 927 336 959 336 959 360 975 360 975 384 991 384 991 407 928 407 928 359 911 359 911 383 880 383 880 312 896 312 896 287 880 287 880 263 848 263 848 240 [[Hills]] | |||
#Mountains, hills, Deathlands for the eastern edge of the map. | |||
rect 1215 119 1232 144 [[Eyn Roj]] | |||
poly 1247 48 1247 72 1263 72 1263 167 1247 167 1247 240 1263 240 1263 287 1231 287 1231 312 1247 312 1247 407 1231 407 1231 431 1216 431 1216 384 1232 384 1232 359 1199 359 1199 407 1152 407 1152 384 1168 384 1168 336 1184 336 1184 287 1168 287 1168 239 1152 239 1152 216 1184 216 1184 143 1168 143 1168 96 1184 96 1184 72 1216 72 1216 48 [[Moon Stair]] | |||
poly 1279 0 1279 503 1264 503 1264 311 1248 311 1248 215 1152 215 1152 191 1120 191 1120 143 1104 143 1104 119 1072 119 1072 96 1088 96 1088 72 1136 72 1136 48 1200 48 1200 24 1216 24 1216 0 [[Moon Stair]] | |||
poly 1279 120 1279 551 1247 551 1247 599 1216 599 1216 575 1183 575 1183 599 1072 599 1072 576 1120 576 1120 552 1200 552 1200 528 1215 528 1215 552 1232 552 1232 504 1248 504 1248 311 1232 311 1232 239 1120 239 1120 215 1088 215 1088 120 [[Hills]] | |||
poly 1279 120 1279 599 1024 599 1024 551 1008 551 1008 383 928 383 928 359 912 359 912 335 896 335 896 216 912 216 912 192 976 192 976 144 1008 144 1008 120 [[Deep jungle]] | |||
rect 304 24 1199 599 [[Jungle]] | rect 304 24 1199 599 [[Jungle]] | ||
| Line 106: | Line 125: | ||
=== [[:Category:Locations|Locations]] === | === [[:Category:Locations|Locations]] === | ||
The general world map layout, including rivers, biomes, and notable story locations (such as | The general world map layout, including rivers, biomes, and notable story locations (such as {{favilink|Grit Gate}} and {{favilink|Bethesda Susa}}), is predetermined and will be the same in every playthrough. | ||
Additional locations, such as villages (including your starting [[village]]), ruins, [[Historical Site|historical sites]], lairs, and many other places, are randomly generated and different every playthrough. | Additional locations, such as villages (including your starting [[village]]), ruins, [[Historical Site|historical sites]], lairs, and many other places, are randomly generated and different every playthrough. | ||
| Line 113: | Line 132: | ||
Terrains represent the types of land or other topography that appear on the world map. | Terrains represent the types of land or other topography that appear on the world map. | ||
The areas of the map covered by each terrain, such as the salt dunes, or the | The areas of the map covered by each terrain, such as the {{favilink|salt dunes}}, or the {{favilink|jungle|plural}}, are always consistent. This can help you determine your approximate location by checking your current terrain against the world map, even when lost. | ||
=== [[:Category:Biomes|Biomes]] === | === [[:Category:Biomes|Biomes]] === | ||
| Line 129: | Line 148: | ||
=== Distance === | === Distance === | ||
[[File:Parasangs.png| | [[File:Parasangs.png|frame|left]]Distance on the world map is measured in '''parasangs'''. | ||
Each tile on the world map is one parasang from the next tile. This example image shows a chunk of the world map that is 3 parasangs tall and 8 parasangs wide. The player is currently one parasang south of | Each tile on the world map is one parasang from the next tile. This example image shows a chunk of the world map that is 3 parasangs tall and 8 parasangs wide. The player is currently one parasang south of {{favilink|Red Rock}}. | ||
It is common for [[Village Quest|village quests]] to involve finding a location that is a certain number of parasangs from another location, and you can use the world map tiles as a guide to help you with such quests. | It is common for [[Village Quest|village quests]] to involve finding a location that is a certain number of parasangs from another location, and you can use the world map tiles as a guide to help you with such quests. | ||
<div style="clear:both;height:0px;"></div> | <div style="clear:both;height:0px;"></div> | ||
=== Zones === | === Zones === | ||
Zones are the "screens" that your character moves through, fights in, or completes most other actions. Zones are the actual locations that you can enter from the world map (in other words, everything besides the world map). 1 parasang or tile on the World map represents a 3x3 area of 9 zones. When you descend downward from the world map, you'll arrive by default in the central zone of that parasang. If you've previously discovered special locations, such as ruins, lairs, villages, or other places, you'll be given an option to decide which part of the parasang you want to | Zones are the "screens" that your character moves through, fights in, or completes most other actions. Zones are the actual locations that you can enter from the world map (in other words, everything besides the world map). 1 parasang or tile on the World map represents a 3x3 area of 9 zones. When you descend downward from the world map, you'll arrive by default in the central zone of that parasang. If you've previously discovered special locations, such as ruins, lairs, villages, or other places, you'll be given an option to decide which part of the parasang you want to descend into from the world map. | ||
Here's an example of what 1 parasang of the world map looks like. As you can see, it is a 3 x 3 area composed of 9 total zones. | Here's an example of what 1 parasang of the world map looks like. As you can see, it is a 3 x 3 area composed of 9 total zones. | ||
| Line 163: | Line 183: | ||
| where = _pageNamespace=0 AND IsTerrain = False | | where = _pageNamespace=0 AND IsTerrain = False | ||
}} | }} | ||
</div> | </div> | ||
<div style="padding-right: 3em;"> | <div style="padding-right: 3em;"> | ||
| Line 191: | Line 210: | ||
</div> | </div> | ||
</div> | </div> | ||
==World Tier== | ==World Tier== | ||
{{Main|Zone Tier}} | {{Main|Zone Tier}} | ||
| Line 205: | Line 225: | ||
===World Map, Circa 2020=== | ===World Map, Circa 2020=== | ||
[[Image:World map 2020.png|600px|class=scalable]] | [[Image:World map 2020.png|600px|class=scalable]] | ||
===World Map, Circa 2021=== | |||
[[Image:Qud_World_Map_(reef_version).png|600px|class=scalable]] | |||
{{Mechanics Navbox}} | |||
[[Category:World]] | [[Category:World]] | ||
[[Category:Locations]] | [[Category:Locations]] | ||
[[Category:Mechanics]] | [[Category:Mechanics]] | ||
Revision as of 15:09, 17 January 2023
| This article is a stub. You can help Caves of Qud Wiki by expanding it. |
The world map is a game construct that facilitates travel to various locations within Qud. Its overall appearance is largely the same in every game session, however, certain locations may be found in different places and the majority of locations recorded in the journal are procedurally generated and indicated by a triangle in the corner of the world map tile they can be found in.
Interactive Map
Click on any location to send you to that page!
.png)
.png)
Overview
Locations
The general world map layout, including rivers, biomes, and notable story locations (such as ![]() Grit Gate and
Grit Gate and ![]() Bethesda Susa), is predetermined and will be the same in every playthrough.
Bethesda Susa), is predetermined and will be the same in every playthrough.
Additional locations, such as villages (including your starting village), ruins, historical sites, lairs, and many other places, are randomly generated and different every playthrough.
Terrain
Terrains represent the types of land or other topography that appear on the world map.
The areas of the map covered by each terrain, such as the ![]() salt dunes, or the
salt dunes, or the ![]() jungles, are always consistent. This can help you determine your approximate location by checking your current terrain against the world map, even when lost.
jungles, are always consistent. This can help you determine your approximate location by checking your current terrain against the world map, even when lost.
Biomes
On a smaller scale of terrain, there are several randomly generated biomes that each screen can be affected by. The standard terrain will be slightly altered, be it by being covered in ![]() asphalt or
asphalt or ![]() slime, or have a
slime, or have a ![]() qudzu outbreak. At the greatest concentration of such biomes, there are often rare items or liquids to be found.
qudzu outbreak. At the greatest concentration of such biomes, there are often rare items or liquids to be found.
Caves
The world map and surface zones are only the beginning of your adventure. The vast caves of Qud await you, and you can delve many, many, layers downward in any particular zone. Enjoy the adventure. Live and drink, friend.
You can ascend to the the world map from any surface zone by pressing the Move Up directional key. By default, this is the NumPad Minus (-) key. You can then use the directional keys to move around on the world map. To enter a particular part of the world map that you have traveled to, press the Move Down directional key (+). If there are hostiles nearby, you cannot ascend into the world map. You must be in a safe location first,either by defeating the hostiles or by running away.
Getting Lost
Each time that you move a space on the world map, there is a chance that your character will become lost. If this happens, you'll be forced to enter the zone you're currently travelling over, and you won't be able to re-enter the world map until you regain your bearings. You can regain your bearings by talking to another humanoid, or if you can't find someone to talk to, you will have a chance to regain your bearings naturally each time that you enter a new zone.
Distance

Distance on the world map is measured in parasangs.
Each tile on the world map is one parasang from the next tile. This example image shows a chunk of the world map that is 3 parasangs tall and 8 parasangs wide. The player is currently one parasang south of ![]() Red Rock.
Red Rock.
It is common for village quests to involve finding a location that is a certain number of parasangs from another location, and you can use the world map tiles as a guide to help you with such quests.
Zones
Zones are the "screens" that your character moves through, fights in, or completes most other actions. Zones are the actual locations that you can enter from the world map (in other words, everything besides the world map). 1 parasang or tile on the World map represents a 3x3 area of 9 zones. When you descend downward from the world map, you'll arrive by default in the central zone of that parasang. If you've previously discovered special locations, such as ruins, lairs, villages, or other places, you'll be given an option to decide which part of the parasang you want to descend into from the world map.
Here's an example of what 1 parasang of the world map looks like. As you can see, it is a 3 x 3 area composed of 9 total zones.

|

|

|

|

|

|

|

|

|
Locations
 Asphalt Mines
- •Barathrum's Study
 Bethesda Susa
 Bey Lah
- •charred tree
- Chavvah (settlement)(favilink error!)
 Eyn Roj
 Ezra
Ezra Garden of Geth
 Golgotha
 Grit Gate
 Joppa
Joppa Kyakukya
 Omonporch
 Red Rock
- ruins of Joppa
 Rust Wells
 Rusted Archway
 Six Day Stilt
- Stiltgrounds
 the hydropon
 Thin World
 Tomb of the Eaters
 Trembling Dunes
 waterlogged tunnel
 Yd Freehold
Terrain
World Tier
Each overworld parasang has a base difficulty tier associated with it. In general, a tier represents the minimum level of creatures and objects in that terrain. World map locations have a surface tier value from 0 to 5, and this value is used to determine the zone tier of specific zones within each parasang, whether on the surface or underground.
Refer to the zone tier article for images and additional detail.
History of the World Map
The following are a few historical snapshots of the tile-based World Map over time:
World Map, Circa 2015

World Map, Circa 2019

World Map, Circa 2020

World Map, Circa 2021
| |||||||||||