User:Kernelmethod/Sandbox:ZoneBuilders
| This page is about modding. See the modding overview for an abstract on modding. |
| This article has information that is missing or not up to par.
Reason: This article is currently a work-in-progress. Please check back later. |
Reason: This article is currently a work-in-progress. Please check back later.
| Warning: this is an advanced modding topic that requires familiarity with C# and several other areas of modding. We recommend reading Modding:Worlds first. |
Zone builders are bits of code that allow you to shape the generation of a zone. At the lowest level of detail they are used to place and remove objects from zones; more broadly, they can be used to shape the geometry and encounters that a player runs into in a room.
The game provides a limited suite of generic builders that you may find useful for your mod. In general, if you are making small alterations to a zone you do not need to deal with zone builders. On the other hand, if you're planning to create your own maps with custom procedural generation, you will want to know how to write them by hand.
Introduction
Preamble: example code on this page
This page presents several examples that you can refer to for creating your own zone builders. If you wish to follow along with these examples, you should create a small example mod that starts with the following code:
Worlds.xml
<?xml version="1.0" encoding="utf-8" ?>
<worlds>
  <world Name="ZBWorld" ZoneFactory="ZBWorldZoneFactory" DisplayName="zone builder test world">
    <cell Name="ExampleCell">
      <zone Level="10" x="1" y="1" Name="test zone">
        <!-- Leave empty for now -->
      </zone>
    </cell>
  </world>
</worlds>
ZoneFactories.cs
namespace XRL.World.ZoneFactories {
    public class ZBWorldZoneFactory : IZoneFactory {
        public override bool CanBuildZone(ZoneRequest Request) => false;

        public override Zone BuildZone(ZoneRequest Request) {
            var zone = new Zone(80, 25);
            zone.ZoneID = Request.ZoneID;
            return zone;
        }

        public override void AddBlueprintsFor(ZoneRequest Request) {
            var cb = Blueprint.CellBlueprintsByName["ExampleCell"];
            Request.Blueprints.Add(cb.LevelBlueprint[1, 1, 10]);
        }

        public override void AfterBuildZone(Zone zone, ZoneManager zoneManager) {
            ZoneManager.PaintWalls(zone);
            ZoneManager.PaintWater(zone);
        }
    }
}
This will create a miniature world, ZBWorld, that we will use for testing. To teleport into this world, use the wish goto:ZBWorld.40.12.1.1.10.
Using zone builders
When the player enters a new zone, the game builds the new zone using the following procedure:
- First, it identifies the appropriate zone factory for the world that the player is in (JoppaWorld, ThinWorld, etc.).
- The game then runs
CanBuildZoneon the zone factory to determine the method that it should use to generate the zone[1].- When it returns true, the zone factory calls the factory's
BuildZonemethod to create the zone. - Otherwise, the zone factory calls
GenerateZoneto instantiate the zone andAddBlueprintsFor.
- When it returns true, the zone factory calls the factory's
- In most cases in JoppaWorld, the game takes the
AddBlueprintsForroute. In this case, the game looks up the terrain object for the zone and searchesWorlds.xmlfor the zone blueprint that it should apply to the zone[2]. - The game then iterates over the zone builders defined by the blueprint and applies them successively to the new zone.
Designing a custom zone requires you to select the builders that you want to use for the zone and add them to the zone. In the majority of cases, you will do this statically through Worlds.xml. As an example, here's the specification of MoonStairCell (used to generate generic ![]() Moon Stair zones):
Moon Stair zones):
<cell Name="MoonStairCell" Inherits="DefaultJoppaCell" ApplyTo="TerrainMoonStair">
  <zone Level="5-9" x="0-2" y="0-2" Name="sky above the Moon Stair" IndefiniteArticle="the" AmbientBed="Sounds/Ambiences/amb_bed_moonstair">
    <builder Class="Sky"></builder>
  </zone>
  <zone Level="10" x="0-2" y="0-2" Name="Moon Stair" IndefiniteArticle="the" AmbientBed="Sounds/Ambiences/amb_bed_moonstair">
    <builder Class="MoonStair"></builder>
    <builder Class="FactionEncounters" Population="GenericFactionPopulation"></builder>
    <music Track="Reflections of Ptoh" />
    <postbuilder Class="ZoneTemplate:MoonStair"></postbuilder>
  </zone>
  <zone Level="11-15" x="0-2" y="0-2" Name="subterranean stair">
    <builder Class="MoonStair"></builder>
    <builder Class="PossibleCryotube"></builder>
    <builder Class="FactionEncounters" Population="GenericFactionPopulation"></builder>
    <music Track="Reflections of Ptoh" />
    <postbuilder Class="ZoneTemplate:MoonStairCaves"></postbuilder>
  </zone>
</cell>
Cell specifications are broken up by X, Y, and Z-levels. Depending on where the player is, they will trigger different builders appropriate to their location.
The other place that zone builders are often added is dynamically during world generation. For example, this is how ![]() Oboroqoru, Ape God's lair, goatfolk yurts, and dynamic villages are placed by
Oboroqoru, Ape God's lair, goatfolk yurts, and dynamic villages are placed by JoppaWorldBuilder. It is possible, but less common, to dynamically apply zone builders in other parts of the game.
Generic, pre-existing zone builders
The game provides a limited suite of zone builders that are sufficiently generic that they can be easily applied to any zone.
| Builder name | Description |
|---|---|
| AddBlueprintBuilder | Adds an object with a specified Object parameter as a blueprint. In general it is preferable to use zone templates and population tables to add (non-structural) objects to zones, so this is primarily useful when you need to dynamically add on a zone builder. For example: this builder is used to place the chest containing the |
| AddWidgetBuilder | Adds an object to the (0, 0) cell of a zone. Typically this is a Widget object (see ObjectBlueprints/Widgets.xml) although in theory it can be anything. An AddWidgetBuilder builder is added to the zone whenever you use the <widget/> tag in Worlds.xml. For example,
<widget Blueprint="Grassy" />
adds a |
| Connecter | |
| FactionEncounters | Adds encounters with legendary creatures sampled from a provided table. |
| MapBuilder | This builder loads a map from a .rpm file. A MapBuilder is implicitly to a zone by the <map/> tag in Worlds.xml. For example, the map for the <map FileName="YdFreehold.rpm" />
|
| Music | Adds a music track to a zone. A Music zone builder is implicitly added by the <music/> tag in Worlds.xml. For example, the music for the <music Track="MoghrayiRemembrance" />
|
| SolidEarth | Fills the entire map with |
| StairConnector | |
| StairsDown | Adds a set of |
| StairsUp | Adds a set of |
| TileBuilding |
In general, the game's existing zone builders tend to be highly monolithic, so any zone builders not listed above are not recommended for use in creating new types of zones. For new zones modders should favor a more modular architecture.
The ZoneBuilderSandbox interface
ZoneBuilderSandbox is the primary interface for creating new zone builders. Any builders that you add to the game will inherit from this class.
Most zone builders only need to define one method: BuildZone. This method accepts a zone instance, and returns a boolean that signals whether or not subsequent zone builders should also run[3]. As an example, here is the definition for the SolidEarth zone builder:
namespace XRL.World.ZoneBuilders;

public class SolidEarth
{
    public bool BuildZone(Zone Z)
    {
        for (int i = 0; i < Z.Width; i++)
        {
            for (int j = 0; j < Z.Height; j++)
            {
                Z.GetCell(i, j).Clear();
                Z.GetCell(i, j).AddObject(GameObjectFactory.Factory.CreateObject("Shale"));
            }
        }
        return true;
    }
}
This builder
- loops over each cell in the zone (incidentally: nowadays there is a
Zone.GetCellsmethod to make this even easier); - clears all objects that are currently in the cell; and
- adds a
 shale object to the cell.
When designing new zone builders, you should (where possible) prefer to create modular zone builders that can be easily reused. As a general rule, earlier builders should define coarse-grained detail about a zone such as layout and general geometry. Builders that come later should be focused on adding fine-grained details (e.g. individual rooms and encounters) to the zone.
Helpful utilities
In principle, ZoneBuilderSandbox is all that you need in order to build a zone. In practice, you will want to rely on some other utilities when generating zones. This section will cover some of the most important utilities available to you.
EnsureAllVoidsConnected
ZoneBuilderSandbox includes an EnsureAllVoidsConnected that will create paths between empty spaces in your zone. This is particularly useful when you are carving out your zone from another material.
For example: consider the following zone builder:
namespace XRL.World.ZoneBuilders {
    public class CreateVoids : ZoneBuilderSandbox {
        public bool NoisyPath = true;

        public bool BuildZone(Zone Z) {
            foreach (var cell in Z.GetCells()) {
                if (
                    cell.CosmeticDistanceTo(20, 12) < 4 ||
                    cell.CosmeticDistanceTo(50, 12) < 4
                   )
                    cell.Clear();
            }
            EnsureAllVoidsConnected(Z, pathWithNoise: NoisyPath);
            return true;
        }
    }
}
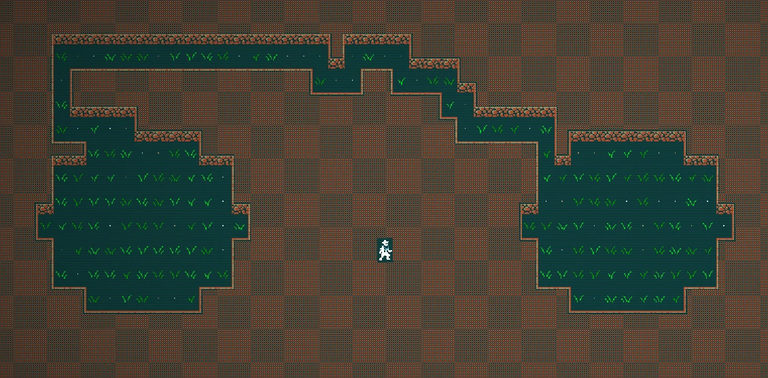
This will create two pockets of empty space -- one centered at coordinates (20, 12), another centered at coordinates (50, 12) -- and connects them with EnsureAllVoidsConnected. By setting pathWithNoise we can make a somewhat randomized path between these voids.
Starting from the code in the introduction, update your Worlds.xml to include the following:
<!-- ... -->
<zone Level="10" x="1" y="1" Name="test zone">
  <builder Class="SolidEarth" />
  <builder Class="CreateVoids" />
  <widget Blueprint="Grassy" />
</zone>
<!-- ... -->
Here is an example of a zone that gets generated with these builders:
Pathfinding FindPath
If you want to create a path directly between two cells, you can use the FindPath interface (which is also used by creature AI to find the shortest path between two points).
Here is an example of the CreateVoids zone builder from the EnsureAllVoidsConnected example using pathfinding (this time with a straight path between the voids).
using XRL.World.AI.Pathfinding;

namespace XRL.World.ZoneBuilders {
    public class CreateVoids : ZoneBuilderSandbox {
        public bool BuildZone(Zone Z) {
            foreach (var cell in Z.GetCells()) {
                if (
                    cell.CosmeticDistanceTo(20, 12) < 4 ||
                    cell.CosmeticDistanceTo(50, 12) < 4
                   )
                    cell.Clear();
            }

            var path = new FindPath(Z.GetCell(20, 12), Z.GetCell(50, 12));
            foreach (var step in path.Steps)
                step.Clear();

            return true;
        }
    }
}
PlacePopulationInRegion
PlacePopulationInRegion samples some objects from a population table and places them in a specified set of cells. It is commonly used to limit the area for an encounter. A more limited version of this is PlacePopulationInRect which works specifically for rectangles.
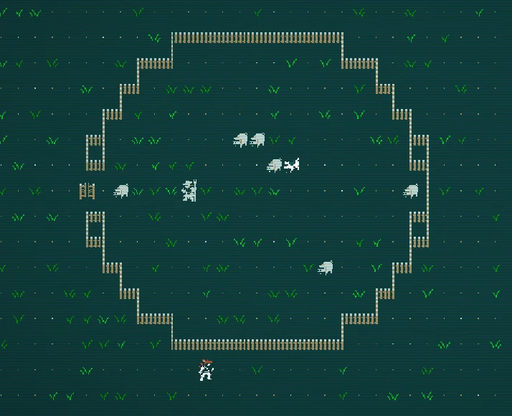
The following zone builder demonstrates use of PlacePopulationInRegion to create a little circular farm in the center of the zone:
using Genkit;
using System;
using System.Collections.Generic;

namespace XRL.World.ZoneBuilders {
    public class CreateCircularFarm : ZoneBuilderSandbox {
        public bool BuildZone(Zone Z) {
            var region = new List<Location2D>();

            foreach (var cell in Z.GetCells()) {
                var dist = cell.CosmeticDistanceTo(40, 12);
                if (dist > 6)
                    continue;

                cell.Clear();
                if (dist == 6)
                    cell.AddObject("BrinestalkStakes");
                else
                    region.Add(cell.Location);
            }

            PlacePopulationInRegion(Z, region, "PigFarm");

            // Add a little door
            Z.GetCell(30, 12).Clear();
            Z.GetCell(30, 12).AddObject("Brinestalk Gate");

            return true;
        }
    }
}
Create a PopulationTables.xml so that you can define the PigFarm table:
<?xml version="1.0" encoding="utf-8" ?>
<populations>
  <population Name="PigFarm">
    <group Name="Creatures" Style="pickeach">
      <object Blueprint="PigFarmer" />
      <object Blueprint="Herding Dog" />
      <object Blueprint="Farm Pig" Number="3-6" />
    </group>
  </population>
</populations>
And now add the zone builder it to your Worlds.xml with
<zone Level="10" x="1" y="1" Name="test zone">
  <builder Class="CreateCircularFarm" />
  <widget Blueprint="Dirty" />
</zone>
This should produce a tiny farm that looks like the following:
Other utilities
Finally, here are some other less commonly-used utilities that you may nonetheless find helpful for your use case:
| Name | Class | Description |
|---|---|---|
| ClearRect | ZoneBuilderSandbox | Clears out all of the objects from a rectangle in a given zone. |
| PlaceHut | ZoneBuilderSandbox |
Creating encounters with zone templates
| This article is a stub. You can help Caves of Qud Wiki by expanding it. |
Noise generation
An important component of procedural generation is generating noise: a randomized signal with special properties (depending on the application). There are many kinds of noise that are relevant to games development: Perlin noise, simplex noise, fractal noise, to name a few.
There are two primary interfaces available in-game for noise generation.
FastNoise
Caves of Qud provides the FastNoise class to help you generate various kinds of noise. FastNoise is used heavily throughout the Qud codebase; among other places,
- by the
Stratazone builder (used by generic underground zones) to define wall layout based on the wall material. - by the
 Moon Stair zone builder to define the layout of crystals.
 - by the
RiverBuilderzone builder in the pathfinding algorithm used to generate rivers, by assigning random weights to cells. - by the
CrystalGrassyandCrystalDirtywidgets to paint floor tiles in the Moon Stair.
In general, usage of FastNoise entails instantiating a FastNoise instance, setting noise generation parameters on it, and then sampling using GetNoise(x,y,z). For example, here's how the CrystalGrassy part samples simplex noise:
namespace XRL.World.Parts;

[Serializable]
public class CrystalGrassy : IPart
{
    [NonSerialized]
    private static FastNoise fastNoise = new FastNoise();

    // ...

    public static double sampleSimplexNoise(string type, int x, int y, int z, int amplitude, float frequencyMultiplier = 1f)
    {
        fastNoise.SetSeed(getSeed(type));
        fastNoise.SetNoiseType(FastNoise.NoiseType.SimplexFractal);
        fastNoise.SetFrequency(0.25f * frequencyMultiplier);
        fastNoise.SetFractalType(FastNoise.FractalType.FBM);
        fastNoise.SetFractalOctaves(3);
        fastNoise.SetFractalLacunarity(0.7f);
        fastNoise.SetFractalGain(1f);
        return Math.Ceiling((double)fastNoise.GetNoise(x, y, z) * (double)amplitude);
    }

    // ...
}
Explanations of all of the different noise types and parameters are outside the scope of this tutorial. However, we strongly recommend trying out the noise exploration tool from the Auburn/FastNoiseLite repository, either by installing it and running it locally or by running it in the browser.
As a practical example, here's a zone builder that simply creates a wall distributed using sampled noise:
namespace XRL.World.ZoneBuilders {
    public class RandomWalls : ZoneBuilderSandbox {
        public bool BuildZone(Zone Z) {
            var noise = new FastNoise();
            noise.SetSeed(0);
            noise.SetNoiseType(FastNoise.NoiseType.SimplexFractal);
            noise.SetFrequency(0.05f);
            noise.SetFractalType(FastNoise.FractalType.FBM);
            noise.SetFractalOctaves(3);
            noise.SetFractalLacunarity(0.7f);
            noise.SetFractalGain(1f);

            // Z.wX/Z.wY are the X/Y coords of the parasang; X and Y are the
            // coordinates within the parasang.
            int dX = (3 * Z.wX + Z.X) * 80;
            int dY = (3 * Z.wY + Z.Y) * 25;
            foreach (var C in Z.GetCells()) {
                if (noise.GetNoise(C.X + dX, C.Y + dY, Z.Z) >= 0)
                    C.AddObject("Shale");
            }

            return true;
        }
    }
}
Try adding it to the Worlds.xml provided to you in the introduction by adding the following:
<!-- ... -->
<zone Level="10" x="1" y="1" Name="test zone">
  <builder Class="RandomWalls" />
  <widget Blueprint="Dirty" />
</zone>
<!-- ... -->
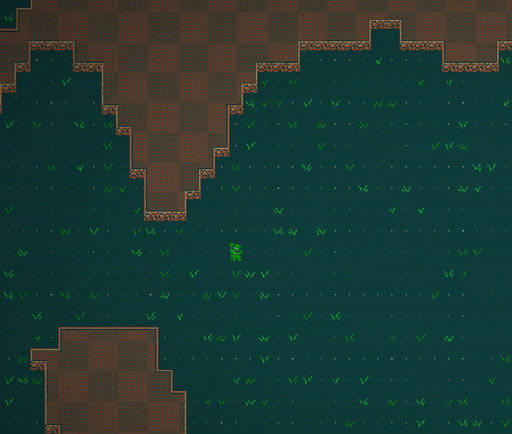
Here's an example of some walls generated by this noise:
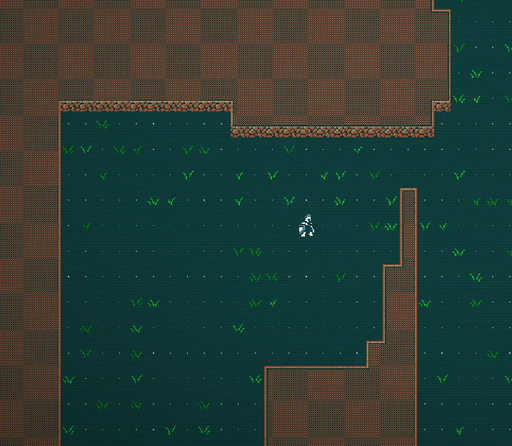
Compared this with the type of walls that we generate when we use cellular noise:
noise.SetSeed(0);
noise.SetNoiseType(FastNoise.NoiseType.Cellular);
noise.SetFrequency(0.05f);
noise.SetCellularDistanceFunction(FastNoise.CellularDistanceFunction.Natural);
noise.SetCellularReturnType(FastNoise.CellularReturnType.CellValue);
noise.SetCellularJitter(0.1f);
The walls generated by this kind of noise are blocky relative to the smoothness of simplex noise.
NoiseMap
The other utility class that is frequently used for noise generation is NoiseMap (in XRL.World.ZoneBuilders.Utility). This is also used extensively throughout the game, for example:
- it is used to distribute water in
 Lake Hinnom and in
  River.
 - it is used to distribute clumps of trees in the outskirts of
 Bey Lah.
 - it is used to make some random regions of walls holographic in the chuppah of
 Girsh Qas and
  Girsh Qon
NoiseMap provides a few less customizability options than FastNoise, and doesn't support as many different types of noise. Nonetheless, it is helpful to understand as NoiseMap as it is used extensively throughout Qud's codebase. Loosely speaking, the algorithm used by NoiseMap works by convolving a grid of random noise with a custom filter several times, blurring the noise in a manner similar to how box linear filtering and Gaussian blurring work. The convolution process iteratively averages groups of contiguous pixels, smoothing out the noise and producing regions of higher or lower magnitude.
Wave collapse
Zone templates
The final step of zone generation is adding encounters -- creatures, objects, or events that the player might encounter in the zone. For this you will generally want to use zone templates.
A zone template is typically applied as a postbuilder on a zone:
<zone Level="10" x="0-2" y="0-2" Name="Palladium Reef" IndefiniteArticle="the" AmbientBed="Sounds/Ambiences/amb_bed_palladiumReef">
  <builder Class="Reef" />
  <builder Class="FactionEncounters" Population="GenericFactionPopulation" />
  <music Track="Substrate" />
  <postbuilder Class="ZoneTemplate:PalladiumReef" />
</zone>
The line <postbuilder Class="ZoneTemplate:PalladiumReef" /> tells the game to apply the PalladiumReef zone template defined in ZoneTemplates.xml after all the other builders have run.
ZoneTemplates.xml
ZoneTemplates.xml has a relatively complex structure that allows modders to layer several criteria on top of one another before placing objects from a population.
We start with a simple example, the Mushroomy zone template:
<zonetemplate Name="Mushroomy" RegionSize="100">
  <global>
    <population Table="MushroomyGlobal"></population>
  </global>
</zonetemplate>
All this zone template says is that objects should be sampled from the MushroomyGlobal population table and spawned around the zone, without much care for the area in which they spawn.
For many situations, a zone template with this structure is sufficient. However, you will often want to have more control over where and how objects are placed. For example: if you're trying to set up a zone simulating a battle between two warring factions, you probably want creatures from one faction to appear in the left half of the zone, and creatures from the other faction appear in the right half.
We will start with an overview of the structure of ZoneTemplates.xml, and in particular the tags that it supports.
| XML tag | Meaning |
|---|---|
<zonetemplate>
|
Defines a new zone template. Once defined, the zone template can be invoked by name from Worlds.xml using postbuilders, e.g.
<postbuilder Class="ZoneTemplate:Rivers" />
|
<global>
|
Defines a set of instructions that should apply over the entire zone. |
<eachregion>
|
Defines a set of instructions that should apply over each contiguous region of the zone. |
<single>
|
|
<group>
|
|
<cellfilterout>
|
|
<exit>
|
If the conditions to reach those node are met, then we stop executing the zone template on the region that we are currently processing. |
InfluenceMapBlocker
Examples
We will work through an example to demonstrate some of the capabilities of zone templates. Start by updating your Worlds.xml to the following:
<zone Level="10" x="1" y="1" Name="test zone">
  <widget Blueprint="Dirty" />
  <postbuilder Class="ZoneTemplate:ZTTest" />
</zone>
Now create a ZoneTemplates.xml with the content below:
<?xml version="1.0" encoding="utf-8" ?>
<zonetemplates>
  <zonetemplate Name="ZTTest" RegionSize="200">
    <global>
      <population Table="EmptyField" />
    </global>

    <eachregion>
      <group Chance="30" Criteria="RegionHasSemanticTag:Inside">
        <population Table="SnapjawParty0" />
      </group>

      <group Chance="30" Criteria="RegionHasSemanticTag:Rect1">
        <population Table="BaboonParty" />
      </group>

      <group Chance="30" Criteria="RegionHasSemanticTag:Rect2">
        <population Table="IssachariParty" />
      </group>
    </eachregion>
  </zonetemplate>
</zonetemplates>
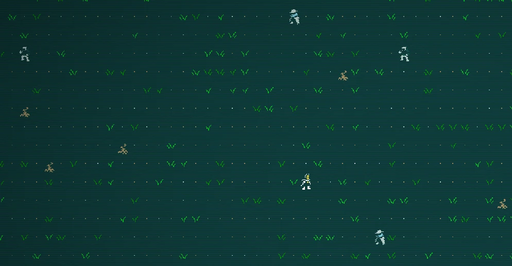
Observe that so far we haven't actually added any structure to our test world's zones, so the only part of the zone template above that will actually apply is the part between the <global>...</global> tags. Indeed, if we teleport into our test world, we should find it bare modulo some content from the EmptyField population table:
Now we will add a zone builder which layers on some additional structure. Create the following zone builder ZTExample:
using Genkit;

namespace XRL.World.ZoneBuilders {
    public class ZTExample : ZoneBuilderSandbox {
        public bool BuildZone(Zone Z) {
            var rect1 = new Rect2D(20, 7, 30, 17);
            var rect2 = new Rect2D(50, 7, 60, 17);
            PlaceHut(Z, rect1);
            PlaceHut(Z, rect2);

            for (int x = rect1.x1; x <= rect1.x2; x++) {
                for (int y = rect1.y1; y < rect1.y2; y++) {
                    Z.GetCell(x, y).AddSemanticTag("Inside");
                    Z.GetCell(x, y).AddSemanticTag("Rect1");
                }
            }

            for (int x = rect2.x1; x <= rect2.x2; x++) {
                for (int y = rect2.y1; y < rect2.y2; y++) {
                    Z.GetCell(x, y).AddSemanticTag("Inside");
                    Z.GetCell(x, y).AddSemanticTag("Rect2");
                }
            }

            return true;
        }
    }
}
This builder creates two rectangular regions, and adds semantic tags to all of the cells inside of those regions. The net result is that the first region is set up such that the two zonetemplate groups with criteria RegionHasSemanticTag:Inside and RegionHasSemanticTag:Rect1 apply to the first region, while the zonetemplate groups with criteria RegionHasSemanticTag:Inside and RegionHasSemanticTag:Rect2 apply to the second region.
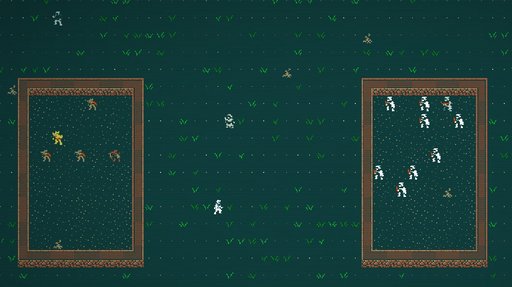
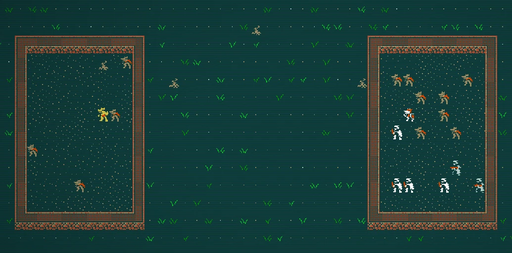
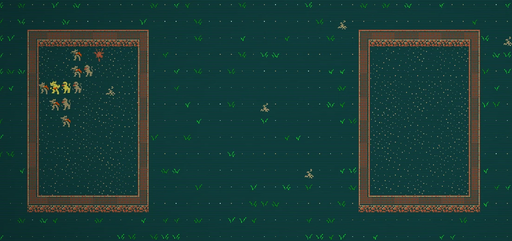
Add the new builder to your Worlds.xml with <builder Class="ZTExample" />, and teleport into your world again. As you move across the different zones, you should observe that:
- snapjaws will occasionally spawn in one or both of the rectangular boxes;
- baboons will occasionally spawn in the left box;
- Issachari will occasionally spawn in the right box; and
- some dogthorn trees, arconauts, and other creatures will spawn throughout the entire zone (including, occasionally, within the boxes).
The semantic tags that we added to our cells impacted what creatures and objects spawned throughout our region. Here are a few screenshots of some zones generated by this zone builder / zone template combination:
You should try painting one of the rectangles with InfluenceMapBlockers, for example
/* In first loop */
Z.GetCell(x, y).AddSemanticTag("Inside");
Z.GetCell(x, y).AddSemanticTag("Rect1");
Z.GetCell(x, y).AddObject("InfluenceMapBlocker");
You should observe that after adding these blockers, objects stop spawning in the rectangle.
